

Advanced Technical Example : Scan Shop Floor Insight Barcodes from a C# Windows Application
The purpose of this advanced technical example is to provide a working, end-to-end starting point for developers building their own interface using Shop Floor Insight APIs instead of the standard Shop Floor Insight scanning interface. It demonstrates one possible flow at a high level, with enough request and response detail to help you begin development.
This example demonstrates a Windows Forms application that:
- Accepts barcodes from a keyboard-style scanner.
- Sends barcode actions directly to Business Central.
- Reconstructs chunked responses and retains the returned employee, time card, and client configuration.
- Retrieves time card lines, work instructions, and production components.
- Records production output, scrap, and consumption.
- Ends the employee’s shift.
Shop Floor Insight supports many additional workflows and configuration options that this example does not cover. The sample is a foundation for understanding the integration, rather than a complete replacement scanning application.
The barcode must contain a slash, one letter, eight hexadecimal characters, and a percent sign—for example, /R00000003%. Configure the scanner to send Enter after each scan. Alternatively, paste the barcode and click Send scan.
Source code and README:
https://dev.azure.com/InsightWorks/External%20Examples/_git/Shop%20Floor%20Insight%20Examples?path=/ShopFloorInsightWinFormsSimpleExample
The README covers building and operating the application. This article extends it by explaining the requests, responses, identifiers, and resulting Business Central records.
Double-Check whether a custom client is needed
Evaluate the available interfaces before committing to a separate application:
- Shop Floor Insight’s standard barcode scanning interface (the best option for most scanning stations)
- Warehouse Insight’s Shop Floor Insight integration (another option for ruggedized tablets, or using the Windows Client with Warehouse Insight 3.0)
- Shop Floor Insight through the Business Central phone/tablet app (for built-in phone and tablet support with the Business Central phone/tablet app)
- Shop Floor Insight and standard Business Central pages (no barcode scanning, but acceptable for office workers or manual time entry).
Compare their capabilities with your requirements. A custom client means taking responsibility for its user experience, maintenance, and handling of server instructions.
Licensing still applies
A custom interface does not bypass Business Central licensing. Device licenses may cover qualifying shared shop-floor devices, but their rights are limited. Confirm the appropriate user or device licensing with your Microsoft partner, including web service access.
Microsoft’s licensing information:
https://learn.microsoft.com/en-us/dynamics365/business-central/dev-itpro/deployment/licensing
Before you begin
Understand Business Central web services, production orders, components, and the output and consumption journals. Finalize and validate your production process in BC first: successfully post output and consumption before developing the interface. Also learn Shop Floor Insight’s standard capabilities and configuration.
For an overview, see Optimizing MES: Shop Floor Insight for Dynamics 365 Business Central:
https://dmsiworks.com/webcasts/optimizing-mes-shop-floor-insight-for-dynamics-365-business-central
Install and configure Shop Floor Insight in a Business Central test environment. Follow the service configuration guidance in:
You will need:
- Windows and the .NET 10 SDK to build and run the example.
- The Business Central OData V4 base URL and exact company name.
- An OAuth identity with the necessary Business Central and Shop Floor Insight access.
- A suitable Shop Floor Client Configuration, including output and consumption journal batches.
- Resource and operation barcodes generated in that company.
- A released production order with routing operations and components.
This walkthrough assumes a Time Entry Mode of Auto. Shop Floor Insight can be configured in different ways, so barcode clock-on and clock-off behavior must be evaluated against your configuration.
Use a test environment. Barcode and menu requests can create or change records, even though this example sends them using HTTP GET.
Published services used by the example
The Shop Floor Insight Setup Wizard installs and publishes the services. If a service is unavailable, check its publication on the BC Web Services page.
| Object type | Object ID | Service name | Purpose |
|---|---|---|---|
| Page | 23044138 | TCMServerBarcode | Barcode scans and End shift menu action |
| Page | 23044212 | TCMTimeCardLine | Current time card lines and selected-line details |
| Page | 23044219 | TCMWorkInstructionsRouting | Production work instructions |
| Page | 23044217 | TCMBom | Production components |
| Codeunit | 23044212 | TCMOutputMgmt | Record output and scrap |
| Codeunit | 23044210 | TCMConsumptionMgmt | Record consumption |
| Page | 23044228 | TCMJobPlanningLine | Job planning information, when using job lines |
A Business Central page web service exposes record-shaped data. A codeunit web service exposes server-side AL procedures. AL is Business Central’s extension language.
The object type matters: a page and codeunit can have the same service name but serve different purposes.
Understand the two sign-ins
OAuth authenticates the application code’s connection to Business Central. The code acquires an access token and includes it in HTTP requests so Business Central can identify and authorize the caller.
In interactive mode, the code makes those requests on behalf of the Business Central user who signed in. With service-to-service authentication, an application identity is used instead.
The employee badge scan serves a separate purpose: it tells Shop Floor Insight which shop-floor employee is performing the work within that authenticated connection.
| Identity | How it is selected | Purpose |
|---|---|---|
| Business Central user or application | OAuth access token supplied by the code | Authenticates and authorizes the code’s requests to Business Central |
| Shop Floor Insight employee | Resource barcode scan | Selects the employee whose attendance and production work are being recorded |
Signing in to Microsoft does not select a shop-floor employee. Scanning an employee badge does not authenticate the code with Business Central.
In the sample responses, USERID and ConnectedAs identify the BC connection identity, shown as BCAUTHENTICATEDUSERGOESHERE. Employee_No separately identifies WORKER 1.
Configure the connection
Enter the following in Connection / scanning station:
| Field | Meaning |
|---|---|
| Base URL | The environment’s OData V4 root |
| Company | The exact BC company name, including case |
| Initial client configuration | An SFI client configuration number, or blank to let SFI select it |
| Scanning station IP address | The station address supplied to SFI |
A Business Central online base URL has this shape:
https://api.businesscentral.dynamics.com/v2.0/{tenant-id}/{environment}/ODataV4For the examples below, {BaseUrl} represents that root. Replace YourCompanyNameHere with your actual company name.
The station address defaults to a detected local IPv4 address. Developers can edit it to simulate another scanning station. This changes the Input_Address sent to Shop Floor Insight; it does not change the computer’s network configuration.
Connection and authentication preferences are saved as user settings. Station address overrides apply to the current run; the next launch detects the local IP again.
After a successful resource scan, the connection section collapses. Click its header to reopen it.
Choose an OAuth scenario
OAuth allows the code to obtain an access token from Microsoft Entra ID and present it to Business Central:
Authorization: Bearer {access-token}Use an access token intended for Business Central, rather than an ID token or a token issued for Microsoft Graph or Azure management. BC still applies the permissions of the user or application making the request.
OAuth authentication is not a concept as part of the Shop Floor Insight API, it is a mandatory authentication requirement for communicating with web services in Business Central. This article is not a comprehensive guide on working with OAuth with Business Central, rather it instead has bare-minimum integration required to provide a couple of workable examples for developers to get started quickly.
Microsoft’s overview:
Scenario 1: Interactive sign-in with a normal BC user
This scenario is implemented by the example.
- Select Interactive OAuth (device code).
- Enter the Entra tenant ID or domain for the BC environment.
- Enter a suitable Entra Client ID.
- Click Sign in / change account.
- Copy the displayed user code into the verification page opened in the browser.
- Complete account selection, authentication, MFA, and consent as required.
- Return to the application after sign-in completes.
The client ID identifies the calling application. It is not an employee number, SFI configuration number, or password.
The example uses Microsoft Authentication Library, or MSAL, to obtain tokens:
var result = await application
    .AcquireTokenWithDeviceCode(
        new[] { "https://api.businesscentral.dynamics.com/.default" },
        code =>
        {
            deviceCodeProgress?.Report(code);
            return Task.CompletedTask;
        })
    .ExecuteAsync(timeout.Token);

string accessToken = result.AccessToken;
MSAL obtains a device code and waits for browser sign-in to finish. The displayed user code is temporary sign-in information; it is not the access token sent to BC.
The .default scope requests the configured permissions for the BC resource. It does not grant unrestricted Business Central access.
The example stops waiting for an unfinished device login after five minutes.
Device-code flow reference:
https://learn.microsoft.com/en-us/entra/identity-platform/v2-oauth2-device-code
Scenario 2: Use the example’s Microsoft PowerShell client ID for development only
The editable PowerShell client ID defaults to:
1950a258-227b-4e31-a9cf-717495945fc2This uses an existing Microsoft PowerShell public client registration to simplify development and testing.
Do not use this shared Microsoft client ID for a production deployment of your custom application. Use an appropriately configured application registration of your own. This client ID is used purely to simplify the development and deployment of this example API integration.
The shared registration also does not guarantee that a tenant will permit the requested sign-in or consent. Tenant restrictions and Conditional Access can prevent it from working.
Scenario 3: Use your own Entra application registration
For a custom delegated client, configure an appropriate Entra registration and enter its client ID.
For this device-code implementation:
- Configure the application as a public client and allow public client flows.
- Add the Business Central delegated
user_impersonationpermission. - Obtain the required consent.
- Sign in as a BC user with the necessary access.
A desktop public client should not depend on keeping a client secret inside its executable. This device-code implementation does not require a localhost redirect listener.
Microsoft’s delegated BC authentication walkthrough:
Scenario 4: Paste an existing access token
Select OAuth access token and paste an access token acquired separately for Business Central.
This mode supplies the token to service requests. It does not acquire or refresh the token. Replace it when it expires or is rejected.
The example saves pasted tokens encrypted for the current Windows user, separately for each base URL/company combination.
Scenario 5: Unattended service-to-service (S2S) authentication
An unattended integration can use OAuth client credentials to act as an application instead of a person.
This requires separate setup, including an Entra application, appropriate BC application permissions and consent, and an enabled application entry with assigned permissions in BC. API.ReadWrite.All is the application permission used for BC APIs and web services.
The example does not implement client-credentials token acquisition or credential management. When testing with an application access token acquired separately, pasted-token mode only supplies that token; it does not perform the S2S setup or renewal.
Keep confidential application credentials in an appropriate service-side location.
Microsoft’s S2S setup guide:
S2S does not bypass Microsoft’s device licensing requirements, all device licensing requirements must still be adhered to when using OAuth service-to-service (s2s).
Saved sign-in and startup validation
Interactive mode saves the MSAL cache and selected account using Windows-user encryption. MSAL can reuse a valid token or renew it silently when permitted.
On startup, the example checks a usable saved token with a read-only request:
GET {BaseUrl}/Company?$top=1
Authorization: Bearer {access-token}
Accept: application/json
If accepted, the barcode controls become available without another device-code prompt.
This confirms that BC accepts the token. It does not prove that the selected company name, every SFI service, or every write permission is correct.
Authentication remains expanded when sign-in is unavailable or startup validation fails. After successful interactive sign-in or saved-session restoration, it collapses.
Employee and time card context is not restored between application runs. Scan the employee badge again.
Expected workflow
The normal sequence is:
- Configure the connection and authenticate the code with Business Central.
- Scan the employee/resource barcode.
- Scan the production operation barcode to clock on to a specific production order and operation.
- Retrieve work instructions or components as needed.
- Record output, or load the BOM and record consumption.
- To clock off, scan the same production order routing barcode to clock off that same production order and operation, or scan a different production order routing line barcode to switch work.
- Review the time card and journal entries.
- End the shift.
This sequence assumes Time Entry Mode is Auto. Other modes support different behavior, including concurrent work entries or manual time entry. Do not apply the switching behavior described here to every SFI configuration.
From login to recording output


From login to recording consumption

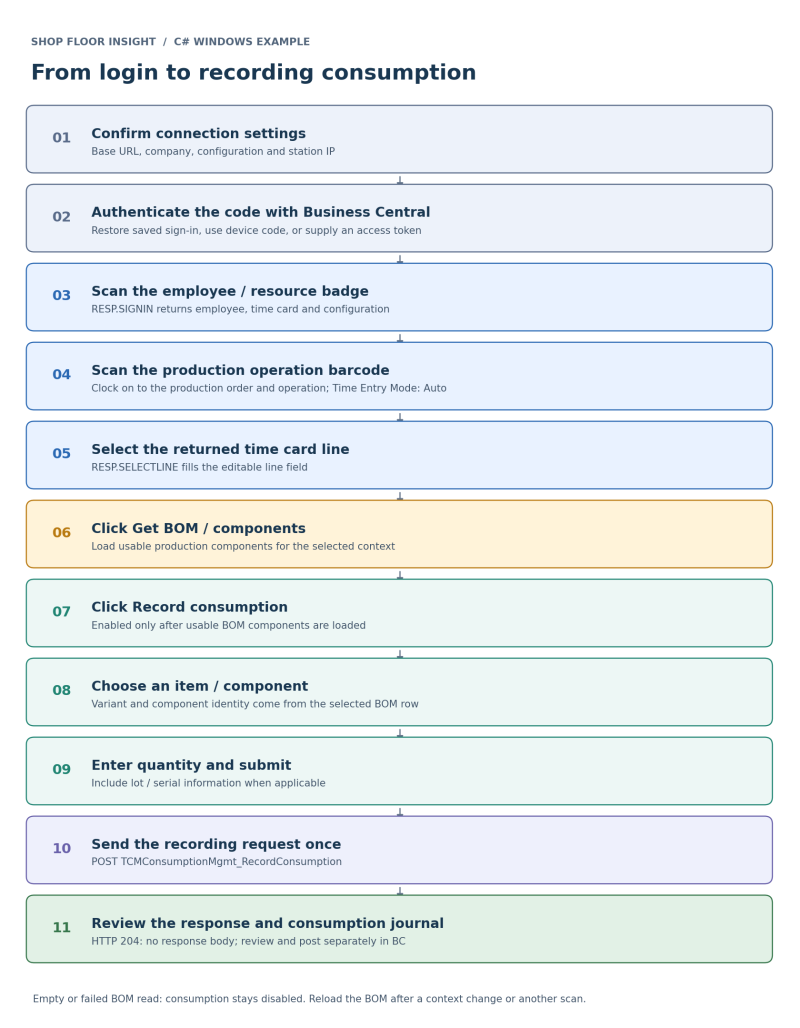
Output does not require a BOM read. Consumption does.
Request conventions used below
The examples show decoded request URLs and filters for readability. The application constructs a single URI and URI-encodes its values.
All BC requests include:
Authorization: Bearer {access-token}
Accept: application/json
Recording POST requests also include:
Content-Type: application/jsonResponse excerpts omit unrelated fields. Barcodes, record numbers, company names, and quantities are illustrative; use values generated in your own company.
1. Scan the employee badge
In BC, print Shop Floor Employee Badges and scan a badge.
Without a physical scanner, open Shop Floor Barcode Entries, filter to resource entries, and copy the full barcode.
For this walkthrough:
/R00000003%The first scan uses the LOGIN context:
GET {BaseUrl}/Company('YourCompanyNameHere')/TCMServerBarcode?$filter=Input_Action_Type_Code eq 'BARCODE.SCAN' and Input_Action_Data eq '/R00000003%' and Input_Screen_Code eq 'LOGIN' and Input_Address eq '192.168.1.50'If an initial configuration was entered, the request also includes:
Input_Config_No eq 'CFG000001'Blank inputs are omitted. Before employee sign-in, there is no employee or time card number to include.
Understand the response
The application displays logical SFI responses in sequence.
A shortened RESP.NOOP payload identifies the connection and environment:
{
  "COMPANYNAME": "YourCompanyNameHere",
  "USERID": "BCAUTHENTICATEDUSERGOESHERE",
  "SESSIONID": 61466,
  "CURRENDDATETIME": "2026-10-29T21:51:12.272Z"
}
RESP.DECODE describes the barcode mapping:
{
  "return_value": "WORKER 1|0",
  "type": "Resource",
  "mapid": 3,
  "isbreak": false
}
RESP.SIGNIN supplies the employee session:
{
  "Time_Card_Header_No": "TC001116",
  "Employee_No": "WORKER 1",
  "Employee_Name": "Example worker 1",
  "Login_Time": "2026-10-29T21:51:12.293Z",
  "Client_Config_No": "CFG000001",
  "ConnectedAs": "BCAUTHENTICATEDUSERGOESHERE"
}
The application retains:
| Returned field | Used for |
|---|---|
| Employee_No | Subsequent employee-context actions |
| Time_Card_Header_No | Subsequent actions and time card reads |
| Client_Config_No | The configuration selected by SFI |
SFI may create a new card or select an appropriate existing card. Do not assume the badge scan always creates a new card.
The complete response also includes Client_Config, which is JSON serialized inside a JSON string. For example, \u0022 represents a quotation mark. Deserialize that string separately if your custom client needs its configuration properties.
For this walkthrough, the configuration uses DEFAULT for both consumption and output batches. Configure appropriate batches for each operational scanning station.
At this point, the employee has signed in but has not necessarily started a production operation.
How the application reconstructs responses
The HTTP response contains an OData value array with fields such as Sort_No, Response_Code, and Response_Data.
Response_Data is a string containing the logical response payload. Large payloads can span subsequent CHUNK rows.
This simplified wire-format example illustrates the structure:
{
  "value": [
    {
      "Sort_No": 1,
      "Response_Code": "RESP.SIGNIN",
      "Response_Data": "{\"Time_Card_Header_No\":\"TC001116\","
    },
    {
      "Sort_No": 2,
      "Response_Code": "CHUNK",
      "Response_Data": "\"Employee_No\":\"WORKER 1\",\"Client_Config_No\":\"CFG000001\"}"
    }
  ]
}
The client:
- Orders rows by
Sort_No. - Starts a logical response when the code is not
CHUNK. - Appends each
CHUNKto the preceding response’s data. - Parses the reconstructed payload.
Do not parse each chunk as a complete JSON document.
These chunks differ from OData pagination. The example follows pagination for ordinary read services, but deliberately does not follow an action response’s @odata.nextLink, because another action request could repeat a change.
2. Scan a production operation
Generate operation barcodes using the Shop Floor Production Order report. For development testing, copy a routing barcode from Shop Floor Barcode Entries.
For this walkthrough:
/O0000003E%Scan the production operation barcode to clock on to a specific production order and operation.
The barcode identifies a mapping. SFI resolves it to the production order, production order line, and operation; the custom client does not need to decode those values from the barcode itself.
The request now includes the employee session:
GET {BaseUrl}/Company('YourCompanyNameHere')/TCMServerBarcode?$filter=Input_Action_Type_Code eq 'BARCODE.SCAN' and Input_Action_Data eq '/O0000003E%' and Input_Config_No eq 'CFG000001' and Input_Screen_Code eq 'TIME_CARD' and Input_Address eq '192.168.1.50' and Input_Employee_No eq 'WORKER 1' and Input_Time_Card_No eq 'TC001116'Relevant responses are:
RESP.DECODE
{
  "return_value": "101002|10000|10",
  "type": "Routing",
  "mapid": 62,
  "isbreak": false
}
RESP.RELOADTC
{
  "Time_Card_Header_No": "TC001116"
}
RESP.SELECTLINE
{
  "Time_Card_Header_No": "TC001116",
  "Line_No": 10000
}
In this example, the scan clocks the employee into the operation and creates the related time card line.
RESP.RELOADTC tells the client the card needs refreshing. RESP.SELECTLINE identifies the related time card line. The example updates its context and editable line field; click Get current time card to retrieve the records.
Keep the different line numbers separate
| Identifier | Sample | Meaning |
|---|---|---|
| Time card number | TC001116 | Employee’s SFI time card |
| Time card line number | 10000 | Work entry on that card |
| Production order number | 101002 | Manufacturing order |
| Production order line number | 10000 | Produced-item line on the order |
| Operation number | 10 | Routing operation |
| Component line number | 20000 | A material requirement on the production order |
Some numbers happen to match. They are not interchangeable.
Editing Time card line selects another line locally. It does not change the BC record or clock into that work.
3. Retrieve work instructions
Click Get work instructions.
The application first reads the selected time card line to resolve its source work:
GET {BaseUrl}/Company('YourCompanyNameHere')/TCMTimeCardLine?$filter=Time_Card_No eq 'TC001116' and Line_No eq 10000For a production line, it then requests:
GET {BaseUrl}/Company('YourCompanyNameHere')/TCMWorkInstructionsRouting?$filter=Status eq 'Released' and SFI_Time_Card_No eq 'TC001116' and SFI_Time_Card_Line_No eq 10000The displayed result in this example contains:
[
  {
    "Status": "Released",
    "Line_No": 1,
    "Comment": "Production Quantity : 10",
    "SFI_Time_Card_No": "",
    "SFI_Time_Card_Line_No": 0
  }
]
These are instruction rows produced by the service. Do not use the instruction row’s Line_No as the selected time card line.
4. Retrieve production components
Click Get BOM / components.
After resolving the selected time card line, the application requests components for its production order line and operation:
GET {BaseUrl}/Company('YourCompanyNameHere')/TCMBom?$filter=Status eq 'Released' and Prod_Order_No eq '101002' and Prod_Order_Line_No eq 10000 and pcodOperation eq '10'The service applies its component and routing-link logic.
An excerpt is:
[
  {
    "Prod_Order_No": "101002",
    "Prod_Order_Line_No": 10000,
    "Line_No": 10000,
    "Item_No": "SP-BOM1301",
    "Description": "Housing AutoDrip",
    "Unit_of_Measure_Code": "PCS",
    "Quantity": 1,
    "Expected_Quantity": 10,
    "Remaining_Quantity": 10,
    "Variant_Code": "",
    "Location_Code": ""
  },
  {
    "Prod_Order_No": "101002",
    "Prod_Order_Line_No": 10000,
    "Line_No": 20000,
    "Item_No": "SP-BOM2000",
    "Description": "Reservoir Assy.",
    "Unit_of_Measure_Code": "PCS",
    "Quantity": 1,
    "Expected_Quantity": 10,
    "Remaining_Quantity": 10,
    "Variant_Code": "",
    "Location_Code": ""
  }
]
Quantity is the component quantity on the order line, while Expected_Quantity and Remaining_Quantity describe the order’s material requirement. The popup asks for the quantity actually being consumed; it does not automatically consume the expected quantity.
The application retains each component’s item, variant, component line number, description, and location. Repeated item numbers on different component lines remain separate choices.
A successful read with usable production components enables Record consumption. An empty or failed read leaves it disabled.
Changing context or sending another barcode clears the cached BOM. Load it again before recording consumption.
5. Record consumption
With the BOM loaded:
- Click Record consumption.
- Select the item/component from the dropdown.
- Confirm the automatically filled variant.
- Enter the consumption quantity.
- Enter lot or serial information when applicable.
- Click Record consumption in the popup.
Selecting one SP-BOM2000 component sends:
POST {BaseUrl}/TCMConsumptionMgmt_RecordConsumption?company=YourCompanyNameHere
Authorization: Bearer {access-token}
Content-Type: application/json
Accept: application/json
{
"pcodBatchName": "CFG000001",
"pcodTimeCardHeaderNo": "TC001116",
"piTimeCardLineNo": 10000,
"pcodLocationCode": "",
"pcodProdOrderNo": "101002",
"piProdOrderLineNo": 10000,
"piProdOrderCompLineNo": 20000,
"pcodItemNo": "SP-BOM2000",
"pcodVariant": "",
"pdQuantity": 1,
"pcodLotNumber": "",
"pcodSerialNumber": "",
"psDescription": "Reservoir Assy."
}Despite its historical parameter name, this example supplies the configuration number in pcodBatchName. The service uses the time card configuration and its configured consumption batch, with the supplied configuration number as fallback. Do not replace this with the literal batch name merely because of the parameter name.
The observed successful response is:
HTTP/1.1 204 No ContentThere is no JSON response body. The application displays the status and indicates that no body was returned.
Open the configured Consumption Journal batch in BC. Verify the production order, order line, component line, item, tracking, and quantity.
Recorded is not the same as posted. In this walkthrough, consumption remains in the journal for review and posting.
6. Record output and scrap
With a production time card line selected:
- Click Record output.
- Enter output and scrap quantities.
- Enter lot or serial information when applicable.
- Click Record output in the popup.
For output quantity 2 and scrap quantity 3:
POST {BaseUrl}/TCMOutputMgmt_RecordOutput?company=YourCompanyNameHere
Authorization: Bearer {access-token}
Content-Type: application/json
Accept: application/json
{
"ptxtConfigNo": "CFG000001",
"ptxtTimeCardNo": "TC001116",
"piTimeCardLineNo": 10000,
"pdQuantity": 2,
"pdScrap": 3,
"pcodScrapCode": "",
"pcodLotNumber": "",
"pcodSerialNumber": "",
"pcodLocationCode": "",
"pcodBinCode": "",
"pcodLicensePlate": ""
}SFI resolves the produced item, production order, and operation from the selected time card line. The example leaves explicit scrap-code, location, bin, and license-plate overrides blank.
The observed response is:
HTTP/1.1 204 No ContentIn the configured Output Journal batch, this walkthrough produces separate entries for output quantity 2 and scrap quantity 3.
Review and post those entries through the normal BC process. The example does not call a separate journal-posting procedure.
Both popups leave business validation to SFI and BC, including item tracking requirements. Canceling sends no recording request.
7. Clock off the operation and inspect the time card
With Time Entry Mode set to Auto, clock off by either:
- Scanning the same production order routing barcode to clock off the same production order and operation.
- Scanning a different production order routing line barcode to clock off the current work and start the other work.
For the first option in this walkthrough, scan:
/O0000003E%Shop Floor Insight supports other time entry modes and workflows. For example, configurations can allow concurrent entries or manual time recording. The behavior described here assumes Auto and should not be treated as universal.
The request again uses BARCODE.SCAN with the employee, time card, configuration, and TIME_CARD context.
The response can again contain RESP.DECODE, RESP.RELOADTC, and RESP.SELECTLINE. Those codes alone do not distinguish clock-on from clock-off. Read the time card to inspect the resulting state.
Click Get current time card:
GET {BaseUrl}/Company('YourCompanyNameHere')/TCMTimeCardLine?$filter=Time_Card_No eq 'TC001116'An excerpt after clock-off is:
[
  {
    "Time_Card_No": "TC001116",
    "Line_No": 10000,
    "Employee_No": "WORKER 1",
    "Document_Type": "Prod. Order",
    "Document_No": "101002",
    "Document_Line_No": 10000,
    "Task_No": "10",
    "Document_Description": "AutoDrip ",
    "Task_Description": "Body assembly",
    "Auto_Calc_Field": "Run Time",
    "Run_Time": 0.17,
    "Time_Entry_Unit_of_Measure": "Hours",
    "Output_Quantity": 2,
    "Entry_Creation_Time": "2026-10-29T21:55:43.333Z",
    "Entry_Clock_Off_Time": "2026-10-29T22:05:54.75Z",
    "Operation_Complete": false
  }
]
With automatic time calculation, stored run time can remain zero while the operation is open and be calculated when it is clocked off.
Clocking off does not necessarily mark the operation complete. It also does not mean the time has been posted to the production order. Time card posting is a separate process.
After a successful clock-off, scanning that barcode again can start another entry. Check the current state before repeating a scan.
If Time card line is empty when retrieving the card, the example selects the last returned line. It preserves an existing selection. This means the last row returned by the service, not the largest line number.
8. End the shift
Click End shift after reviewing the work.
This needs the employee, time card, configuration, and an available OAuth identity. It does not need a selected operation line or loaded BOM.
The request uses the same action service:
GET {BaseUrl}/Company('YourCompanyNameHere')/TCMServerBarcode?$filter=Input_Action_Type_Code eq 'MENUITEM' and Input_Action_Data eq 'EndShift' and Input_Config_No eq 'CFG000001' and Input_Screen_Code eq 'TIME_CARD' and Input_Address eq '192.168.1.50' and Input_Employee_No eq 'WORKER 1' and Input_Time_Card_No eq 'TC001116'EndShift is case-sensitive action data.
SFI ends the shift through its business logic and returns RESP.LOCK. The application clears the local employee, time card, selected line, and cached components, then returns to resource scanning.
In BC, verify that the card is no longer open and its logout time has been updated. Closing can also run preparation logic, including filler-time handling where configured.
Ending a shift does not sign the code out of its Microsoft connection. The OAuth identity remains available for the next employee badge scan.
Button prerequisites and error handling
| Action | Required context |
|---|---|
| Send scan | Available authentication and no stopped action session |
| Get current time card | Available authentication and a time card number |
| Get work instructions / Get BOM | Authentication, employee, configuration, time card, and positive selected line |
| Record output | The selected-line context above; the application verifies a production order line |
| Record consumption | The same context plus loaded production components for that context |
| End shift | Authentication, employee, configuration, and time card; no selected line required |
Requests run one at a time. Controls are temporarily disabled while a request or recording popup is active.
The distinction between errors matters:
- A failed read is logged and does not stop later scans.
- A recording error is logged, and controls recover when their prerequisites remain available.
- An uncertain barcode or End shift request stops scans and writes for review.
- A server error or instruction requiring interaction that the example does not implement can also stop the scan session.
A transport failure does not prove the server made no change. Check BC before repeating an action. The example does not automatically retry scans, End shift, output, or consumption requests.
For End shift, HTTP success without the expected RESP.LOCK is not treated as confirmation that the shift ended.
Troubleshooting common issues
| Symptom | Check |
|---|---|
| Company does not exist | Replace YourCompanyNameHere with the exact BC company name, including case |
| Authentication succeeds but no employee is shown | Scan a resource badge; OAuth authenticates the code’s connection, not the SFI employee |
| Barcode does not resolve to the expected work | Use the full barcode generated in the target company and inspect RESP.DECODE |
| Work instruction or recording buttons are disabled | Confirm employee, configuration, card, and a positive selected line are available |
| Record consumption is disabled | Load usable production components for the current context; another barcode or context change invalidates the previous BOM |
| HTTP 204 with an empty body | This is the expected successful response for the recording calls shown; inspect the configured journal |
| Run time is still zero | Check whether the line remains clocked in and whether automatic time calculation is configured |
| Scanning another operation does not close the previous one | Check Time Entry Mode and workflows; this walkthrough assumes Auto |
| No VS Code build task appears | Open the example folder containing its .vscode build task and install the .NET 10 SDK |
| End shift produces no lock acknowledgement | Inspect the responses and time card; confirm SFI action logic is configured to handle the request |
Extending the example
Keep SFI’s server-side business procedures responsible for clocking, configuration selection, and journal recording. Your custom interface should retain returned context and handle the server’s instructions.
The source separates the main responsibilities:
| Source file | Responsibility |
|---|---|
| ScanForm.cs | UI, employee context, barcode/menu requests, and logical response handling |
| DelegatedAuthentication.cs | Interactive OAuth, silent token acquisition, and account selection |
| ProtectedSessionStore.cs | Encrypted saved authentication data |
| SfiReadClient.cs | Time card, instruction, and component reads |
| LoadedBom.cs | Component choices tied to the current context |
| RecordEntryDialog.cs | Output and consumption input |
| SfiJournalClient.cs | Recording procedure requests |
The walkthrough uses production routing operations. The example can also read job planning information, but its output and consumption popups are implemented for production order time card lines.
Shop Floor Insight supports additional workflows beyond this sample. A production custom client must implement the server-driven dialogs, tracking scenarios, workflows, and operational controls required by its users.