
The Quality Inspector integration application allows interacting with and performing actions on Quality Inspector from within Warehouse Insight.
Install
To install the Quality Inspector integration in Business Central, complete the following:
- Navigate to the Warehouse Insight Add-on Catalog in Business Central.
- Select Quality Inspector and select Install.
This installs all data required to run the application, including the extension app file, the Warehouse Insight applications, and supporting data.
Once you have completed the installation, reload the app configuration in the Warehouse Insight Applications page to see the new application data. The Warehouse Insight Device Menus page also has a new option, Quality Inspection, added to MAIN.
Basic usage
- Create quality inspection tests in Business Central.
- Open Quality Inspector app in Warehouse Insight.
- Use the menus Pick Up and Unassign to manage test assignment.
- Use the Choose menu to open a Quality Inspection test.
- Use the menus on the Quality Inspection Test page:
| Menu | Use |
| Create Retest | To finish the test and create a retest. The page redirects to the newly created retest. |
| Finish | To Finish the test |
| Edit Test Value
Clear Test Value |
To modify the test value for a selected line.
If a field has sample lines, the Quality Inspection Samples page opens. On the Quality Inspection Samples page, use the menu:
|
| Take Picture | To take a picture and add it to the test. |
| Scan Page | To open the Scan Page Document, and use the menu:
|
| Edit Line Note | To modify the line note on a selected line. |
| View Work Instructions | To open the Work Instructions page for a selected line.
On the Work Instructions page, use the Open URL menu to open the URL on the selected line with the default browser. |
| View Tool Usage | To open Tool Usage page for a selected line, and use the menu:
|
| Item Inquiry | To open the Item Inquiry page.
New components:
|
Setup
New components
- The Quality Inspection Tests List View field has been added to the Quality Inspection FastTab on the Warehouse Insight Device Configuration card.
- The Storage Account Access Key field has been added to the Artificial Intelligence and Machine Learning FastTab on the Quality Inspector Setup
- The Quality Inspection Permission user type, Warehouse Insight, has been added.
Warehouse Insight Device Columns page
- Update the column style expression by comparing [Grade Style] against Favorable or Unfavorable to apply Font Color and Background Color as needed. See the example below:
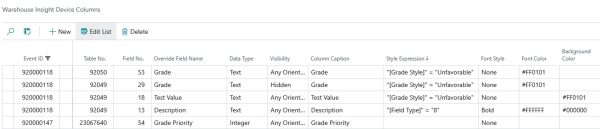
- Update the Visibility field to change the header field and line column visibility.
Print from Warehouse Insight
To print a Quality Inspection report from Quality Inspection App in Warehouse Insight, ensure the following configurations are completed:
- Configure PrintNode Connector:
- Get PrintNode account.
- Get API Key from PrintNode account.
- Install PrintNode client and get printers.
- Navigate to the Report Selection – Insight Works page and complete the following configuration:
- Usage: Custom
- Report ID: 23067640
- Printer Type: Regular Printer
- Custom Table: 23067640
- Navigate to the Warehouse Insight Device Configuration card and complete the following fields (in the General FastTab) with your chosen printers:
- Label Printer Name
- Regular Printer Name
Warehouse Insight FactBoxes
Six types of Warehouse Insight FactBoxes are available with the installation of the Quality Inspector Integration app:
- Item Tracking
- Sample Size
- Sample Statistics
- Sampling
- Status
- Control Information
These FactBoxes can be used in the QI_DOC app and the QI_SAMPLE_LIST app.
Among these six types of Warehouse Insight FactBoxes:
- You can use Item Tracking, Sample Size, and Sample Statistic in both the QI_DOC app and the QI_SAMPLE_LIST app.
- You can only use Sampling, Status, and Control Information in the QI_DOC app.
Navigate to the Warehouse Insight FactBoxes page to see the following:
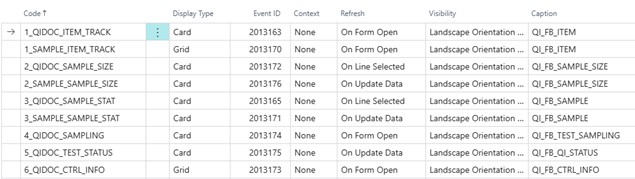
Warehouse Insight FactBox code naming convention
A Warehouse Insight FactBox Code consists of three parts: display order, app name, and FactBox name.
For example, 1_QIDOC_ITEM_TRACK.
- 1: The position of the FactBox when activated in the app. This determines the display order of the active FactBoxes.
- QIDOC: The app this FactBox is intended for.
- ITEM_TRACK: The name of the FactBox.
Default Warehouse Insight FactBoxes configuration
QI_DOC App
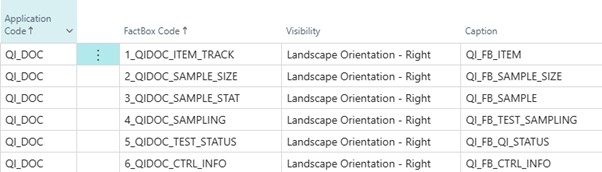
QI_SAMPLE_LIST App

Add/Remove Warehouse Insight FactBoxes to apps
- Navigate to the Warehouse Insight Applications page and view your chosen app (e.g., QI_DOC app).
- Select Related / Application / FactBoxes (opens the Warehouse Insight Application FactBoxes page).
- Add or remove FactBoxes as needed.
Manage Warehouse Insight FactBoxes display order
Continue from step 2 in the Add/Remove Warehouse Insight FactBoxes to apps section. FactBoxes are displayed in alphabetical order. Update the display order:
- Update the first part of the FactBox Code (before the first underscore “_”; see the Warehouse Insight FactBox Code Naming Convention section for more information).
The rest of the code remains unchanged, as it serves as an indicator.
Mange table fields in Warehouse Insight FactBoxes
Users can add or remove table fields in Warehouse Insight FactBoxes.
- Navigate to the Warehouse Insight FactBoxes page and retrieve the Event ID of the FactBox you want to manage.
- Navigate to the Warehouse Insight Device Columns
- Set a filter on the Event ID column using the Event ID retrieved in step 1. For example, to manage table fields on the Warehouse Insight FactBox 5_QIDOC_TEST_STATUS, you will see a page like this:
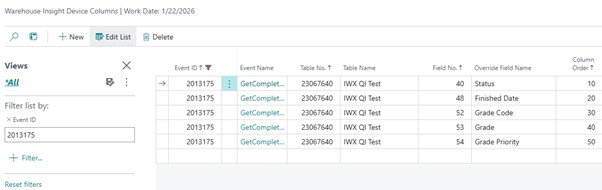
- Add/Remove fields as needed:
- Add a table field: Create a new entry and modify the following fields:
- Event ID: Retrieved from Step 1 (e.g., for Warehouse Insight FactBox 5_QIDOC_TEST_STATUS, it should be 2013175).
- Table No: You can copy this field from other rows; it should match the Table No. of the existing rows (e.g., for Warehouse Insight FactBox 5_QIDOC_TEST_STATUS, it should be 23067640).
- Field No: Select the … button to browse available fields on the table and select the one you need.
- Column Order: Determines the display order of the fields.
- Delete a table field:
- Use the Override Field Name field to locate the field that you want to remove.
- Delete the line.
- Add a table field: Create a new entry and modify the following fields:
Still need help?
Ask other Business Central users in the Insight Works community, or send the details to the support team. Include the steps you took and any error message you saw.