---
title: "19. Configuration"
app: "Warehouse Insight"
section: "How-to guides"
last_updated: "2023-05-11"
url: "https://insight-works.com/kb/warehouse-insight/configuration/"
---
# 19. Configuration
Note: For earlier versions of Warehouse Insight, find the documentation [here](/kb/warehouse-insight/introduction-2/).
There are two primary configuration points that need to be set up prior to utilizing the device software.
- Business Central Device Configuration Code
- Software Configuration
###
### Business Central Device Configuration Code
Each handheld device must be pointed to a device configuration entry in Business Central. To create a device configuration, open the _Device Configurations_ page.
When creating a device configuration, the following fields are important:
| **Field** | **Description** |
| --- | --- |
| Code | The Code will be a unique identifier for this entry (e.g., DEVICE1, RECEIVING, TEST, etc.). If the Code is to be a specific login name, you can leave the Code blank on the device and it will try to find a matching device configuration based on the login username. |
| Location Code | Each configuration can only reference one Location Code. Use this field to indicate which Location the configuration is pointed to (and subsequently, the handheld). Typically, handhelds are for single locations but in some cases it’s required that a single handheld reference multiple locations (E.g., Quarantine locations). In this case, the handheld must switch Device Configurations before working in the new location. This can be done manually by the user or by scanning an appropriate “Device Configuration” barcode. |
| Label/Regular Printer Name | Specify a valid printer in these fields if users will be printing labels/documents from the handhelds. Business Central: PrintNode must also be configured to print. Business Central On Premise: The printer chosen must be installed on the service tier server and be accessible to the user configured to run the Business Central service. |
| Device Logo | Specify an appropriate company logo to display on the handhelds. By default, the Insight Works logo will be displayed on the handhelds. A nice practice is to also include in the logo the location and whether it is a test or live company to avoid confusing users. |
| Use Device Logo | Check this if you are using a logo and want it to show up on the device. |
| Extensibility Codeunit | If the Warehouse Insight installation has been customized/extended, you may specify the Extensibility Codeunit that was created in this field. |
| Reclass/Whse. Reclass Batch Names | If using the Ad-Hoc Movement application, these batch names should be unique to the device configuration and device to avoid overlap conflicts with other devices. If using logins, the batch name can be left blank, but a corresponding batch name with the username must exist. |
When creating Device Configurations, it is not required to have a one-to-one relationship with the devices. A single configuration can be used for all devices if needed. Configurations can be created for any number of reasons (e.g., functional area separation like Receiving/Shipping versus Warehouse operations), per device (e.g., Device1, Device2, etc.), or even per user (e.g., one Configuration for every user).
Splitting configurations often makes sense for but is not limited to, the following reasons:
- **Printers are different**: If different areas have different printers, it makes sense to use a Device Configuration relevant to that area.
- **Batch names conflict**: If multiple people would end up using the same batch, it is advisable to split out the configurations so no conflicts occur.
- **Setting mismatches per configuration**: If a setting or menu needs to be toggled per configuration (e.g., says one device can “post” while another might not be able to).
### Software Configuration
Software configuration is done by launching the Warehouse Insight application and selecting the **Configure** menu option. You will be asked for the Configuration password. If you have not changed it, the default value will be “1234”.
The configuration pages are broken down into 6 pages:
- System
- Logins
- Device
- Barcoding
- Logging
- Data
Note: It is possible to configure the primary settings by scanning a Configuration barcode. See the Device Configuration Barcode report in Business Central.
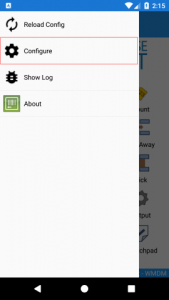
#### System Configuration Page
The System Configuration page is used to enter the primary connection details for connecting to Business Central.
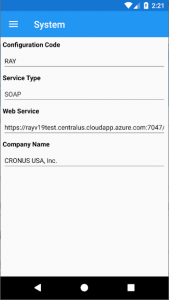
| **Callout ID** | **Description** |
| --- | --- |
| Configuration Code | The device configuration code created in Business Central. |
| Service Type | The type of service to connect to (e.g., SOAP or OData). |
| Web Service | The Warehouse Insight Web Service created during the initial installation process. Use the “Warehouse Insight Device Configuration” report or the “Warehouse Insight Device Installation” report to obtain the appropriate web service URL. |
| Company Name | The company name to connect to (case sensitive). |
#### Logins Configuration Page
The _Logins Configuration_ page is used to toggle the login requirements for connecting to Business Central.
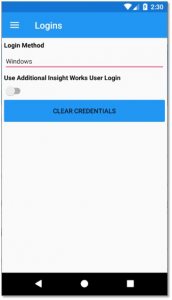
Warehouse Insight supports a few levels of logins. The following table describes these options.
| **Option** | **Description** |
| --- | --- |
| Windows | The handhelds prompt for logins. Logins are validated against Business Central users (windows authentication), and all transactions are executed under the user’s account. |
| OAuth | The handhelds prompt for logins. Logins are validated against an oauth provider, and all transactions are executed under the user’s account. |
| Use Insight Works Users | The device prompts for the initial windows or oauth login credentials and then prompt for an additional Insight Works’ User login. All transactions are executed under the Windows login, but the relevant entries have the _User ID_ fields set to the Insight Works’ User used to log in. |
In addition to the basic authentication process occurring during application start-up, using Logins has an impact in other situations such as transaction auditing:
- Using Logins ensures that Device Activity Entries are associated to the username used to log in with.
- Document List lookups are filtered to those that are assigned to the user or are unassigned.
- Opening a document assigns it to the user if the device configuration option is set to do so.
When using Logins, the device prompts the user for their credentials before opening the application.
Note**:** Use the **Remember Me** option to bypass future login prompts on future connections. This setting can be toggled for both Windows login prompts and User login prompts.
####
##### Windows Logins
To configure Warehouse Insight to use Windows logins, complete the following:
1. Set the handheld configuration Login Method to **Windows**.
2. Create Users in Business Central and generate Web Service Access Keys for each user.
All transactions are processed under the logged in account.
####
##### OAuth Logins
To configure Warehouse Insight to use OAuth logins, complete the following:
1. Set the handheld configuration “Login Method” to **OAuth**.
2. Create Users in Business Central with a valid windows authenticated password.
All transactions are processed under the logged in account.
####
##### Use Additional Insight Works User Login
To configure Warehouse Insight to use Insight Works’ User Logins the following steps should be taken:
1. Set the handheld configuration “Login Method” to either “Windows” or **Oauth**.
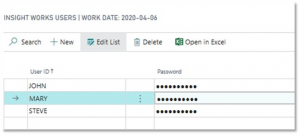
2. Create Insight Works’ Users in Business Central.
The Insight Works Users do not have to be valid Business Central accounts. All transactions are still executed under the Windows account. However, any entries made in Business Central have the User ID set to the Insight Works’ User ID used to log in, such as:
- Value Entries
- Warehouse Entries
- Assigned User ID
####
#### No Logins
This option only applies to on premise installations. All transactions are still executed under the Web Service Application Pool account.
To configure Warehouse Insight to not use logins, complete the following:
1. Ensure that the Warehouse Insight Application Pool account is set to a valid Business Central user with appropriate permissions.
- Assigning the SUPER role is advisable
- If using Device Licenses, this account should be set to a Device Only User in Business Central
2. Set the handheld configuration Login Method to **None**.
####
#### User Logins
To configure Warehouse Insight to use User Logins, complete the following:
1. Set the handheld configuration Login Method to **User**.
2. Create Users in Business Central.
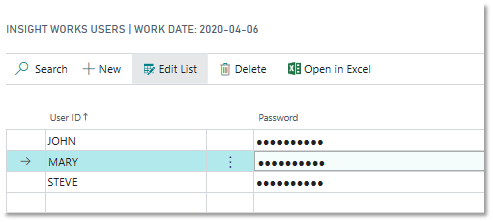
The Users do not have to be valid Business Central accounts. All transactions are still executed under the Windows account. Any entries made in Business Central will have the User ID set to the Insight Works’ User ID used to log in such as:
- Value Entries
- Warehouse Entries
- Assigned User ID
For on premise solutions:
- Ensure that the Warehouse Insight Application Pool account is set to a valid Business Central user with appropriate permissions.
- Assigning the SUPER role is advisable.
- If using Device Licenses, this account should be set to **Device Only User** in Business Central.
The Insight Works’ Users do not have to be valid Business Central accounts. All transactions are still executed under the Web Service Application Pool account. Any entries made in Business Central will have the User ID set to the Insight Works’ User ID used to log in such as:
- Value Entries
- Warehouse Entries
- Assigned User ID
####
#### Windows Logins
- To configure Warehouse Insight to use Windows logins, complete the following: For Business Central on premise solutions:
1. Set the handheld configuration Login Method to **Windows**.
2. Create Users in Business Central.
3. Generate Web Service Access Keys for each user.
- Create Users in Business Central:
1. Ensure the Business Central users have appropriate permission sets applied.
2. If using Device Licenses ensure the users are set to **Device Only User**.
- Modify the Web.Config file to indicate Windows Authentication:
1. Set AuthenticationMode to **2**: ``` 2 ```
Note: All transactions will be processed under the account used to log in with.
#### Device Configuration Page
The Device Configuration page is used to manage miscellaneous, optional behaviors on the device.
| **Option** | **Description** |
| --- | --- |
| Device Name | Specify the name to associate with the device. Will be used when logging entries or batch selection as required. |
| Decimal Places | The number of decimal places to show/allow when a decimal field is displayed. Entries will be rounded to the number of decimal places when needed. |
| Show Page Animations | Toggle the page transition animation. This will provide a more traditional UI experience when switching pages but may have a performance impact. |
| Configuration Password | The configuration password required to access the configuration pages. Default is 1234. |
| Menu Behavior | Controls the menu behavior/visibility. Options are: - Default: Behavior will be whatever the native OS/Device utilizes. - Split on Landscape: Menu will always be shown on the side when in landscape mode. - Split: Force the menu to always be shown on the side when in landscape or portrait mode. - Popover: Prevent the menu from being split and always use the hamburger menu. - Split on Portrait: Menu will always be shown on the side when in portrait mode. |
| Font Size | Specify the default font size to use on the controls/labels |
| Grid Header Font Size | Specify the default font size to use on any grid headers |
| Grid Data Font Size | Specify the default font size to use on any grid rows |
| Status Bar Display | Specify what additional information to display in the status bar: - Blank - Company Name - Location Code |
| Enable Sign-Out After Inactivity | Enable auto sign out due to inactivity. |
| Sign-Out After Inactivity (minutes) | Specify the number of minutes to wait before signing the active user out. |
| Connection Timeout (seconds) | Specify the number of seconds to wait for a Business Central request to return. |
| FactBox Landscape Height (%) | Specify the FactBox height as a percentage of the application height when in landscape mode. |
| FactBox Landscape Width (%) | Specify the FactBox width as a percentage of the application width when in landscape mode. |
| FactBox Portrait Height (%) | Specify the FactBox height as a percentage of the application height when in portrait mode. |
| FactBox Portrait Width (%) | Specify the FactBox width as a percentage of the application width when in portrait mode. |
| Image Capture Width (px) | Specify the captured image width to size to prior to sending to Business Central. |
| Image Capture Height (px) | Specify the captured image height to size to prior to sending to Business Central. |
| Image Capture Rotation (degrees) | Specify the captured image rotation prior to sending to Business Central. |
| Error Notification Type | The type of notification on to generate when an error occurs. Options are: - None - Sound - Vibrate - Vibrate and Sound |
| Error Notification Sound | The sound to play when a notification triggers when the notifications are set to Sound or Vibrate and Sound. |
| Screen Orientation | Specify the orientations to allow on the device. Options are: - Auto (will rotate display to match the device orientation) - Portrait (will lock the display in portrait mode) - Landscape (will lock the display in landscape mode) |
#### Barcoding Configuration Page
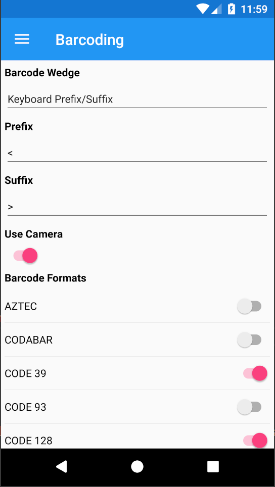
The Barcoding Configuration page is used to manage how the device receives barcode scans. The barcode wedge options are:
- Android Intent
- Keyboard Prefix/Suffix
Note**:** Changing the Barcode Wedge settings requires closing and re-opening the application.
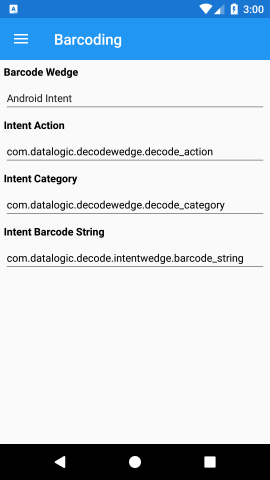
#### _Android Intent_
Most Android scanners provide a mechanism for signaling barcode scans via Intents. The intent strings/keys will be specific to the device but should look similar to the following:
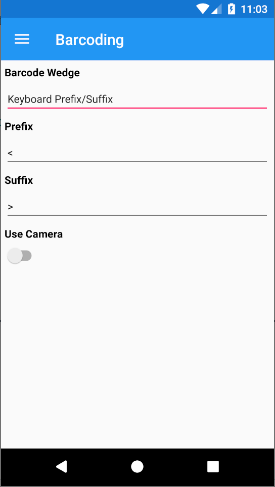
#### _Keyboard Prefix/Suffix_
The scanner can be configured to require that all scans submit a predefined prefix and suffix prior to submitting the barcode data.
For example, if the barcode data scanned was _C-100_ the device would instead send __ to the Warehouse Insight application (presuming the prefix/suffix was **<** and **>**).
The prefix/suffix will be set on the device (exact location/method of doing so dependent on the device). Once done, the same prefix/suffix will be set on the configuration page. The software will listen/look for these special tags and when received know how to correctly interpret/recognize the scan.
This option should be used if your device does not support Scanning Intents.
#### _Using the Camera Scanner_
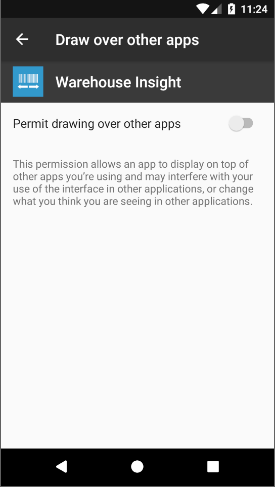
You can use the devices Camera to scan barcodes by enabling the **Use Camera** option. When on, you are prompted to enable the _Draw over other apps_ permission. The **Camera Scanning** button appears over most pages and look like this:

Users can move the button around as needed and the last position will be remembered.
Find the Warehouse Insight application in the list shown and enable the required permission. Once enabled, you can toggle barcode symbologies required. Reducing the amount of enabled symbologies will make the camera scanning more reliable and potentially faster.
#### Logging Configuration Page
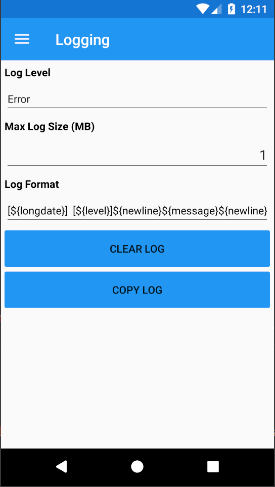
The _Logging Configuration_ page is used to change the logging level, clear, and copy the current log file.
#### Data Configuration Page
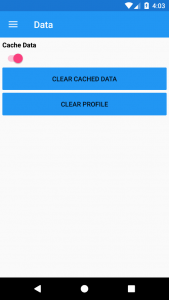
The Data Configuration page is used to configure whether Business Central data should be cached on the device as it pertains to item and bin scanning.
The following table indicates what data is cached and frequencies.
| Table | Frequency |
| --- | --- |
| IWX Barcode Rule | When the application is launched. |
| Bin | When the application is launched. |
| Item Cross Reference | When the application is launched. |
| Item Ledger Entry | Every 5 minutes. |
| Item | When the application is launched. |
| Item Unit of Measure | When the application is launched. |
| --- | --- |
- The **Clear Cached** button is used to delete all cached data entries.
- The **Clear Profile** button is used to delete the current devices profile data (e.g., column widths, visibility, etc.).
### Regionalization
Warehouse Insight supports multiple language options both from Business Central and handheld devices. The following languages are supported:
- • Czech • Danish • Dutch • Dutch (Belgian) • English (Australian) • English (Canadian) • English (New Zealand) • English (United Kingdom) • English (United States) • Estonian • Finnish • French • French (Belgian) • French (Canadian) • French (Swiss) • German • German (Austrian) • German (Swiss) • Icelandic • Italian • Italian (Swiss) • Norwegian • Spanish • Spanish (Mexico) • Swedish
To utilize the Warehouse Insight in alternate languages, you will need to configure the device’s regional setting to the desired language.