---
title: "Configure OAuth Service-to-Service Connections in Shop Floor Insight"
app: "Shop Floor Insight"
section: "Set up"
last_updated: "2026-02-06"
url: "https://insight-works.com/kb/shop-floor-insight/configure-multiple-oauth-service-to-service-connections-in-shop-floor-insight/"
---
# Configure OAuth Service-to-Service Connections in Shop Floor Insight
Note: Use the following instructions when you are:
- on SaaS or are using Microsoft Entra (previously known as Azure Active Directory) authentication,
- and on Business Central 20 or newer,
- and you need multiple connections with different accounts (for scenarios such as multiple time zones),
- or having issues with redirect URLs (sometimes occurs with LS Central environments),
- or you are configuring multiple servers to connect to the same instance for any reason,
- or you want to have improved security and want your Entra application specific to your tenant for more control over access keys.
This article describes how to configure multiple OAuth Service-To-Service (S2S) for multiple Shop Floor Insight windows services. The following instructions are included:
- Create an App Registration in Azure
- Collect the Client Secret, Client ID, and Tenant ID
- Configure the Specialized IDs
- Grant Consent in Business Central
### Create an App Registration (Microsoft Entra Application) in Azure
To create an App Registration in Azure, sign in with an account that has the appropriate permissions to create the App Registration. Complete the following to create the entry:
1. Navigate and log into [Azure](http://portal.azure.com) (if needed).
2. Select **More Services**to access _Azure Active Directory_ and select **App Registrations** under the _Identity_ section.
3. Select **+New registration**.
4. Input a _Name_ (e.g., ShopFloorInsight-TimezoneA).
5. Select **Accounts in this organizational directory** ([Default Directory] only – Single tenant) under _Support account types_ (limits the use of the app registration to the tenant).
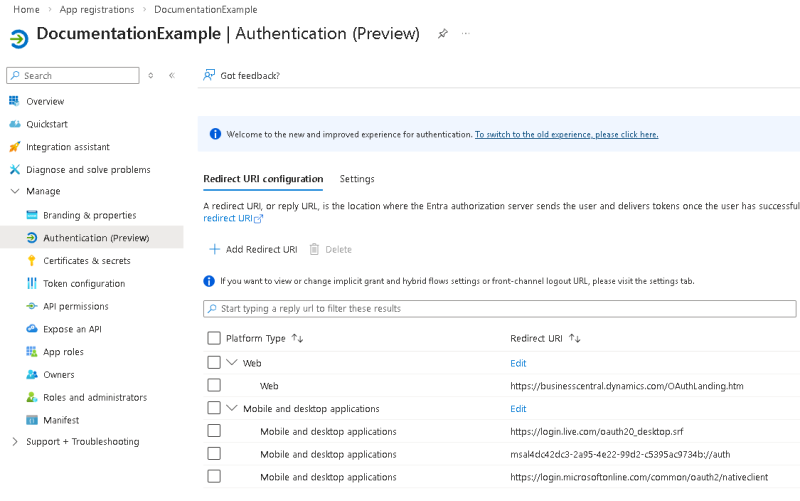
6. Configure and register the following _Redirect URI_ (required for Shop Floor Insight):
- Web: [https://businesscentral.dynamics.com/OAuthLanding.htm](https://businesscentral.dynamics.com/OAuthLanding.htm)
- Or if using LS Central then configure the following _Redirect URI_ (LS Central only):
- Web: [https://lscentral.bc.dynamics.com/OAuthLanding.htm](https://lscentral.bc.dynamics.com/OAuthLanding.htm)
7. Select **Register**.
8. Navigate to the App registrations and select **All Applications**.
9. Locate and select your new entry.
10. Select **Authentication** and select “**Add a platform”, or “Add Redirect URI”**
11. Select **Mobile and desktop applications**.
12. Check the boxes ON for all three entries.
13. Ensure the entry below appears:
-
- [https://login.microsoftonline.com/common/oauth2/nativeclient](https://login.microsoftonline.com/common/oauth2/nativeclient)
- [https://login.live.com/oauth20\_desktop.srf](https://login.live.com/oauth20_desktop.srf)
- msal66d9a62b-ddb9-4855-9ed3-361a0515ed2e://auth (generated automatically for the app registration)
Note: To enter more than one URL, select **Authentication** in the menu. The redirect URI you add is for a “Mobile and Desktop” application. To learn more about URLs, please see Microsoft’s [_Redirect URI (reply URL) restrictions and limitations_](https://docs.microsoft.com/en-ca/azure/active-directory/develop/reply-url) article.
1. Select **API Permissions** and select **+** **Add a Permission**.
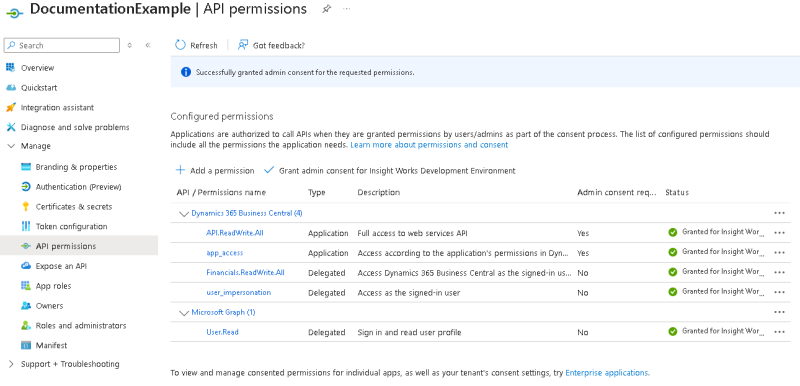
2. Locate the _Dynamics 365 Business Central_ and _Microsoft Graph_ boxes and enable both the delegated and application permissions below (gives Business Central access permissions).
| **API / Permissions name** | **Type** | **Description** | |
| --- | --- | --- | --- |
| **Dynamics 365 Business Central (3)** | | | |
| | API.ReadWrite.All | Application | Full access to web services API |
| | app\_access | Application | Access according to the application’s permissions in Dynamics 365 Business Central |
| | Financials.ReadWrite.All | Delegated | Access Dynamics 365 Business Central as the signed-in user. |
| | User\_impersonation | Delegated | Access as the signed-in user |
| **Microsoft Graph (1)** | | | |
| | User.Read | Delegated | Sign in and read user profile |
1. Grant consent. The button to grant consent might be titled “Grant admin consent for [your organization name here]”.
- If you see this button, but it is not enabled, then you will need to ask your tenant administrator to grant consent for you.
- This still is necessary before proceeding with the remainder of the installation.
- If this step does not occur then you will get authentication errors.
2. A successful grant should show all of the API’s permissions that were requests with the green checkbox in the “Status” column.
### Collect the Client Secret, Client ID, and Tenant ID
Note: Record the client secret when it is first generated as it is only displayed while you are on the page. You are unable to view a client secret after navigating away from the certificates and secrets page.
The GUI allows you to create a client secret that expires after two years. For increased security, we recommend using the GUI and having a timed expiry rather than using PowerShell to set up a client secret with an extended expiration date.
#### Collect the Client Secret
Complete the following to collect the client secret while still in the app registration’s menu:
1. Navigate to _Certificates & Secrets_.
2. Select **+ New Client Secret**.
3. Input a description and expiry (maximum 24 months).
4. Select **Add**.
5. Navigate to _Certificates & Secrets_.
6. Copy the _Client Secret Value_ (Client Secret).
#### Collect the Client ID and Tenant ID
1. Navigate to _Overview_ of the app registration.
2. Copy the IDs from the following fields:
1. Application (client) ID (Client ID) (this is a GUID)
2. Directory (tenant) ID (Tenant ID)
### Configure the Specialized IDs
- If the service is already installed:
1. Edit the IW.TimeCollectionModule.Service.exe.config file.
2. Add the following XML into the settings XML area:
Note: The GUID is found in the app registration in [Azure](http://portal.azure.com), and it is called “Application (Client) ID” as explained in _Collect the Client ID and Tenant ID_ above.
Put in the client ID collected from the previous steps, this will be a guid
Put in the secret value collected from the previous steps
Put in the tenant ID collected from the previous steps
Note: You need to list the settings only once in the config file. Note: If you are copying the settings from this page, ensure the double quotes appear as they should; incorrect double quotation marks in the config file could result in an _Invalid XML syntax_ errors.
- If the service is not yet installed:
1. The application ID can be entered in the installation wizard into the “S2S Client ID” field from the “OAuthS2S Client ID” popup from the service installation wizard. Entering the value here will set the “OAuthClientID” field in the configuration XML file.
2. The secret collected in the earlier steps can be set in the “Password” field in the “OAuthS2S Client Secret” popup from the service installation wizard. Entering the value here will set the “OAuthClientID” field in the configuration XML file.
### Grant Consent in Business Central
When the user selects **Grant Consent**, the user must have sufficient permissions on the tenant to grant consent. This access might not be available to a Business Central administrator but would be available to the tenant administrator. Contact your IT department if you do not know who your tenant administrator is.
Note: This step is also described on the [_Access and Configure Service-to-Service Authentication in Shop Floor Insight_](/kb/shop-floor-insight/access-and-configure-service-to-service-authentication/) page.
1. Navigate to the _Azure Active Directory Applications_ (_Microsoft Entra Applications_) Card in Business Central.
2. Select **+ New**.
3. Enter the:
- Client ID: used in App ID (collected in _Collect the Client ID and Tenant ID_ above)
- Description
4. Change the state to Enabled.
5. Enter the following (minimum) permissions under the appropriate Fast Tab:
- D365 BUS PREMIUM
- IWORKS COMMON
- SFI-SERVICE
- IWX REG REGISTRATION
- IWXQIGENERAL
- LOCAL
- LOGIN
- Sufficient permissions to perform the required Shop Floor Insight tasks (e.g., for jobs, give permissions for jobs; for fixed assets, give permissions for fixed assets; for production orders, give permissions for what they plan on using with production orders).
6. Grant consent and follow the prompts (ensure you are logged in with the appropriate administrative user).
Note: Once consent has been granted, add an entry to the _Shop Floor Function Permission_ page for the user that matches _User Name_ on the Microsoft Entra Application Card. Note: If you see a permission error during the granting process then the account you are using does not have permission to grant consent. Repeat _Grant Consent in Business Central_ using an account with grant consent permission. Note: If you see a permission error in your service log file such as “Authentication\_InvalidCredentials” or “The server has rejected the client credentials.” then one of the steps in this article is missing. Review each step for accuracy and completeness.